Wednesday, 30 September 2015

Woolly Mittens

 
We had our second night of frost last night! The first night was a light covering, but last night was heavier. I was so glad I had gotten all of my herbs inside a head of time. (I'll show you this later.)
This did get me to thinking though that I needed to get with it and finish sewing the order that I had received for my woolly mittens.
 

You might remember the ones that I made last winter and sold where I was working on the Alaskan Highway...
 
I received an order by e-mail for a dozen more of my woolly mittens from my former employer a few weeks back. Needless to say I've been very busy this last week putting them all together. Then I ran out of lining material and had to wait until it arrived yesterday to continue.
I'm excited about experimenting this time by combining a new embroidery pattern I just purchased to the mittens with solid wool tops. 
 I'm crossing my fingers and hoping it works out!
 

If I get good results with it I will be back in a day or two to show you the results. Wish me luck.
Have a good Wednesday!
Kim


Monday, 28 September 2015

Woolly Tatoos

 
Hi Friends!
I'm posting about my Woolly Tatoos here today.
I hope you'll drop by.

Saturday, 26 September 2015

Things That Make Me Laugh


buzzfeed.com
I could really relate to this!
Yes, my hubby had fun putting mustaches on our boys. It was a fun game were they would run from him and he would catch them and paint a mustache above their lips with a magic marker.
So many laughs and good memories now.
 
babble.com
I love this for a Halloween costume!
It reminds me that it's time to drag out Alfred Hitchcock's, 'The Birds' video. I don't think Tippy ever ages...
 
no source
She ate too many of her own Little Debbie's, I guess!
It happens.
 
Don't laugh...
I was raised in redneck country. This could happen! We would never let a little thing like not being able to find a horseshoe stop our fun.
Every restroom has one available, you know.
 
I hope I brought a little smile to your face today.
Have a good weekend, my friends!


Thursday, 24 September 2015

How To Make Poo Spray


If anyone had told me a year ago, or even a month ago, that I would be writing a post about 'How to Make Poo Spray' I would have thought they were crazy!
However, as a Pinterest Copycat I now have a duty to search these household recipes out, make them, try them and report back to my ever faithful followers if they really and truly work.
This one works!!!
For the original recipe go to my Homemade Household Helps board here.
 
                                                                               source

This was my original source for a Poo Spray recipe.
You may follow her recipe if you'd like. I did not have the essential oils on hand that she used. I substituted the essential oil scents with my own fragrance oils, but kept all of the portions the same as Fabulous Farm Girl's recipe.
 
The scents I had on hand were cheaper $1. fragrance oils I had purchased at a dollar stores some time ago. I'm happy to report that they work well. From the many other Poo spray recipes I've researched I found that many advise not using expensive oils for this as the cheaper oils will work just as well.
This is my Pinterest Copycat Recipe:
 
Poo Spray Recipe
 
1/2 cup water (I used bottled)
1 tsp. rubbing alcohol
1 tsp. glycerin
7 Drops of Hot Apple Fragrance Oil
7 Drops of Cinnamon Fragrance Oil
7 Drops of Stormy Night Fragrance Oil
 
Pour directly into a spray bottle with a funnel.
To use shake, then spritz into the toilet bowl before
taking care of business. As I said, this works!
 
Pin Me
 
It's as simple as that.
I am sold on it.
I prefer to eliminate the odour than just cover it up!
Try it, you'll like it.
*********************************************************
Do not be afraid to experiment with your own fragrance combinations.
Partying here:


Tuesday, 22 September 2015

Repurposed File Holder

 
Do you ever purchase something at a yard sale and you are so excited about your find and you know exactly what you want to do with it, and then you wake up two months later and realise that you left the object in your garage and completely forgot about it?
Of course no one can be that forgetful you say.
Ha! Well you don't know me very well yet then do you?
For the rest of this story read here!

Friday, 18 September 2015

Wooden Candle Holder


When I ask you last week what use you would find for this wooden holder I got all kinds of good answers. Here are a few: mail holder, shoe polish and brushes holder, a holder for knives, and a candle holder. One of you even suggested a more decorative idea, like putting small canning jars with flowers in it.
I really liked all of the ideas and there is a possibility that I may eventually use all of them! You know how I'm constantly changing things out.
 My own original thought was to fill the holder with candles since it looks like a Colonial candle holder I've seen in old drawings from that period.
 

 I did like Liz's idea of the more decorative option too. So I tried it dressed out for Fall. Kind of cute this way. Certainly more colour!
Now I need to find a place to hang it in this very small kitchen of mine.
 

I've switched out the Spring bird plate for my cottage plate that is more in line with the Fall colours.
 

I love the verse on this little plate. It always reminds me of Paul speaking in Philippians 4:11
Not that I speak in regard to need, for I have learned in whatever state I am, to be content.
New King James Version
Contentment, an aspiration of mine, for sure.
 

I can't let you get away today without showing you my middle son's latest family photo.
 

Double and Trouble are expecting a new addition to their family in March. This is going to make an even ten for us with grandchildren!
That's the latest here for now....
********************************************************
Hoping your weekend is a blessed one!
Thank you for dropping by-Kim


Tuesday, 15 September 2015

Decorating For Fall


I've finished my Fall decorating. To read more view here.


Monday, 14 September 2015

Projects in the Making


Hello Friends!
I thought I would drop by today to show you a couple of projects that are in the works today.
I bought this wooden box for two dollars some time ago at our local resale shop. I think it looks almost colonial.
The use of the wooden box above is a real mystery to me. Do you have any idea what it might be used for? I may change my mind about what I have planned for it if I knew what it was originally made to hold. Although I do think that I have come up with a good idea for it!
 
For my second project in the works you'll have to pop over to my other blog here to see what else is cooking here at Camp and Cottage Living.
I hope to see you back tomorrow.

Thursday, 10 September 2015

Repurposed Vintage Hankie Display


Hello Ladies!
Today I'm bringing you my Pinterest Copycat version of a repurposed vintage hankie display.
 
source
This is the original Pinterest version of a hankie holder that I copied. I don't own as many hankies as this lady and good thing too since my spoon rack was just a small one compared to her rack.

This is what my spoon rack looked like before I painted it. I love the original wood, but for this project I felt that it needed to be painted.
 I also love the carved maple leaf pattern, so like the Canadian flag.
 

After uploading my photos I realised that I had missed displaying the only handkerchief that really has any special meaning to me. Most of the hankies were either left in the drawer of a dresser I bought or I had purchased somewhere over the years.
 

This handkerchief was one that my Dad gave to his sweetheart, my Mother, when he was serving in the Navy during WW2. I never saw this while my Mom and Dad were living. It was given to me after my SIL found it in a drawer after they had both passed.
I can easily imagine Dad wanting to send something special back to Mom to let her know how much he loved her and missed her while he was away and she was home alone trying to keep things together. She was by herself with two little children and another on the way.
 I like to think that this little satin handkerchief let Mom know that she was never far from my Dad's thoughts....
Mom was my Dad's sweetheart for seventy four years until they both passed away within three months of one another.
Now I consider that a real story of commitment and love, don't you?
I guess I've strayed a bit from my Pinterest copycat post.
Sorry, but it is a treasure I just had to share!
Blessings-Kimberly

Please visit my other blog here.

I will be partying here:
before-after-wednesday-week-6
Home Sweet Home
Simple and Sweet Fridays
What To Do Weekends
Friday Favourites


Wednesday, 9 September 2015

Friday, 28 August 2015

Oak Meadow Homeschooling

Hello everyone!
Today I'm posting over at my other blog here if you'd like to visit me there.
But I have a favour to ask.....
Does anyone know where I can purchase used Oak Meadow homeschooling curriculum?
I am in need of Grades 3 & Grade 6.
My daughter is homeschooling this year and we are finding that Amazon is sold out of the needed books and buying direct is quite expensive.
I have searched the internet already so this is why I am asking you!
Please leave a comment if you know of any sources for these materials.
Many thanks. I appreciate it!
 

Tuesday, 25 August 2015

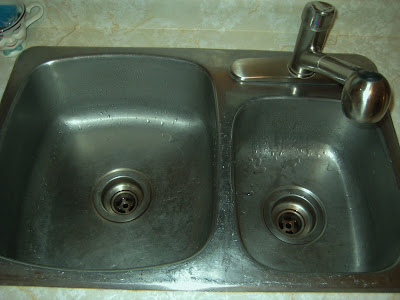
A Pinterest Copycat On How To Clean A Stainless Steel sink


My friends today's Pinterest Copycat project can be found right here. 
I have been looking on pinterest for a recipe to make a stainless steel sink cleaner from products that I always keep on hand in my home.
 And I've found one that works.
The ingredients you will need to get started are:
baking soda
white vinegar
olive oil or baby oil
 
Here's what you do...
Begin by spraying your stainless steel sink surface with the white vinegar.
 
Step two you want to shake baking soda into the sinks.
Leave this to sit for 15 minutes. I went a little over board with the baking soda. You do not need this much at all! Also a step that I added was to scrub the sink. The recipe did not suggest scrubbing, but I did it anyway.
 
The next step is to rinse with boiling water.
Spray again with white vinegar.
 Wipe to dry, then shine with the olive oil or baby oil. 
It works. I will use this recipe again, for sure.
 
             My tea stained before photo is evidence that
this recipe really works.
 

Now I promised you two Pinterst Copycat projects and this pot scrubber that is made from your own onion or orange mesh produce bags is the second.

You can see where I found it here. This scrubber takes about ten minutes to make. I'm not kidding.
Follow the instructions from this original post though because she does such a good tutorial on how to make it.
I only had 3 mesh bags and the original calls for 6.
My scrubber worked just fine in cleaning the sink, so I can imagine that by doubling the thickness it would work even better.
Now tell me, have you ever tried either of my copycat projects before? Do you think you'll give them a try?


Sunday, 23 August 2015

It's A Family Affair

 
It's A Family Affair
 
Tim and I were lucky enough to have a visit from our son, DIL, and their boys this weekend.
 
It was surprising to see how much the boys had grown!
Papa had fun giving the grandsons rides in the wheelbarrow.
 
Here's Reece colouring....
 
Brigam colouring.....
 
                   Fun at the beach with Great Nana.
 

There was a whole lot of sliding...
 

and a fair amount of swinging.
 
It was a short visit, but we sure enjoyed our time together. Tim and I even watched our favourite kids movie, Toy Story 3, with the boys!
 
As you know we are long distance Grandparents so we relish even the short visits we can have with our children and their families. I know many of you are in the same boat, so you understand.
 
I'll be back tomorrow with my latest Pinterest Copycat post. This time around I'm rating two  pinterest projects. Lucky you!
Hope you pop over.
Kim


Monday, 17 August 2015

My Pinterest Copycat Bag Holder


My Pinterest copycat bag holder is a royal sort of bag. Notice the crown atop the birdies head?
 I guess this means it's fit for a Queen!
 
 
I've been needing a new bag holder for some time.
When one of my tea towels had a defect on it that didn't allow use of it for resale I knew it would work perfectly for this project.
I also had a red plaid tea towel on hand I could use as an accent.
 
 
Here is the Pinterest bag holder that I used for inspiration for my own bag.
It's really so nicely done.
 I love all of the patchwork and the combinations of stripes and checks the sewer has used for her bag.


Have you made any projects from a Pinterest inspiration lately. If so I'd love to hear about it!
 
Time now to get my bag holder stuffed and hung for duty.
Blessings-Kimberly
 
View my other blog here.


Tuesday, 11 August 2015

How to Hang Scarves

 
How To Hang Your Scarves
 
Kim's Vintage Sheet Scarf Hanger
 

          Would you like to know the best way to hang your scarves?
Well my friends, I have found a solution for you.
 

And this is not it!
I told you that I would share with you my pinterest successes and my pinterest failures, that I will be a sort of guiniea pig on pinterest ideas for you.
 So I'm here to tell you in all honesty that his way of hanging my scarves turned out to be a big, fat failure for me.
 

This is what happened in reality with my scarf hanger. The shower hooks all slid to one side when knocked or touched at all. This wasn't a major catastrophe, but not quite what I wanted for a scarf hanger.
 

While researching pinterest one day I ran across this version of a scarf hanger. Voila! This is just what I was looking for. This scarf hanger is both pretty and functional.
 

 I know this because I made my own version of it. Mine is not an exact copy.
 This is how I like to use pinterest, as a springboard.


I personalized my scarf hanger by using a favorite vintage sheet, adding a couple of crochet accents, and then labeling it (just for fun).
I  recommend this project. It was fast and easy, and best of all a no cost project. I had all that I needed on hand.
The experts (me) here at Camp and Cottage Living give this pinterest scarf hanger a 10 rating. Ha!
*********************************************************